Writing PNG Images to Sectors
Written by jebug29
Created:  09 May 2020
Modified: 26 May 2020
Video tutorial: https://www.youtube.com/watch?v=ONKVhwCwGBY
Note that if you simply want to write raw PNG image files across sectors, you should use the sdist command. See help sdist
Relevant Commands
Needed Files and Programs
- The GNU Image Manipulation Program, GIMP
- xterm-colors.gpl
- An SFTP or SCP client
- GUI: Filezilla
- Commandline: sftp, scp
Preparing the Image File
In order to write an image file that can be interpreted by the colors and sector2png command, you're going to have to prepare it using an image editor first. For the sake of this tutorial, we're using the GNU Image Manipulation Program (GIMP).
Theoretically the image can be in any format supported by the Python Imaging Library (PIL) fork, Pillow. However, the image must 1) have indexed colors with the xterm color palette and 2) be 16 pixels wide by 32 pixels tall.
Adding the Xterm Color Palette to GIMP
In GIMP, open the palettes dialogue via Windows > Dockable Dialogs > Palettes.
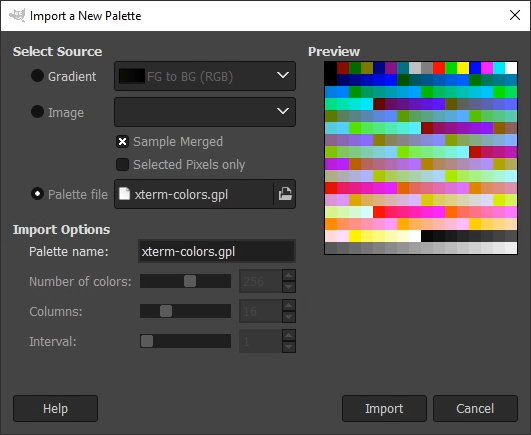
Right click on any existing palette and then click on Import Palette. Select Palette file and then browse for the xterm-colors.gpl file (see above). "Number of colors" should be "256", "Columns" should be "16", and "Interval" should be "1". Import the color palette.

Creating the Image File
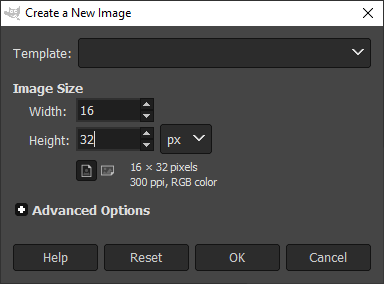
The image file should be 16 width by 32 height. Create this file and apply any image data you want to it, whether it's shrinking another image to fit the size or drawing on it directly.
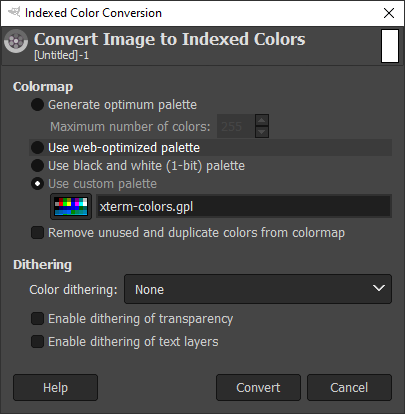
Whenever the image is complete, change the color mode to Indexed (Image > Mode > Indexed). In the dialogue that pops up, select Use a custom palette and select "xterm-colors.gpl". Be SURE to UNCHECK "Remove unused and duplicate colors from colormap" or else the colors will not be indexed correctly!!! You can mess around with dithering if you want to to see what best recreates your image.
To save the image, use File > Export As > somefilename.png
Uploading Files via SFTP or SCP
You will need to upload the file to your Sector Disk home directory.
If you don't already know how to upload files using SFTP or SCP, you can check out this tutorial. I use Filezilla in the video tutorial (see above).
Writing to a Sector
Now that you've got your file in your home directory, you can strip out all the extra image format data and write the pixel data to your sector using the png2sector command! See help png2sector for detailed usage.
Example (writing helloworld.png to sector 1):
png2sector 1 helloworld.png
Reading from a Sector
To the disk and to the system, any sector is simply 512 bytes of data, so of course you could read in any sector with the following commands, the same as you could read any sector using the sr command. If you're sharing your data with other users, you may want to let them know what they should be looking for :p
Using the "colors" Command
If your terminal supports 256 colors, you can view the graphic representation of a sector on the shell using the colors command (see help colors). (Note that the output will be at least 32 characters tall, so you might not be able to view the entire image at a standard 80x24 characters).
Using the "sector2png" Command
You can do this whole process in reverse and convert a sector into a PNG file (or again, any indexed graphics format) by using the sector2png command (see help sector2png). Obviously you won't be able to view a PNG at the shell, so you'll have to download it to your own graphically-enabled machine using SFTP or SCP.